No-Bake Chocolate Cheesecake – Creamy, Rich, and Effortless Dessert
This no-bake chocolate cheesecake brings together smooth cream cheese, velvety chocolate, and a buttery biscuit base for a treat that’s both easy and delicious.
Perfect for any occasion, it requires no oven time and minimal effort.
With every bite, enjoy a luscious texture and deep cocoa flavor that makes this dessert a true crowd-pleaser.
The Ultimate No-Bake Chocolate Cheesecake – A Decadent Dream
I’ve been wanting to make this no-bake chocolate cheesecake for a while.
But since it’s a rich, indulgent dessert that easily serves 12, I was waiting for the perfect occasion—like a birthday celebration!
When we finally sliced into it, every bite was pure bliss. The creamy, silky texture melts in your mouth, while the deep chocolate flavor, enhanced by a hint of coffee, creates a dessert that’s both luxurious and satisfying.
I’ve made countless cheesecakes over the years, ever since Philadelphia cream cheese became easy to find.
I always thought nothing could top a classic New York cheesecake or a decadent Oreo version.
But let me tell you—this no-bake chocolate and coffee cheesecake changed everything.
The verdict? Everyone who tasted it agreed: this is the best cheesecake I’ve ever made.
Smooth, rich, and bursting with bold flavors, it’s the kind of dessert that disappears fast, leaving only one question behind—when are we making it again?
What’s Inside This Irresistible No-Bake Chocolate Cheesecake?
This no-bake chocolate cheesecake is made up of three decadent layers, each one more tempting than the last:
- A Buttery Oreo Crust – No need for baking. Crushed Oreo cookies combined with melted butter create a rich, chocolatey base with the perfect crunch.
- A Lusciously Smooth Chocolate Cream Cheese Filling – A velvety blend of Philadelphia cream cheese, melted dark chocolate, and a hint of instant coffee for extra depth of flavor.
- A Silky Dark Chocolate Coffee Ganache – A glossy, indulgent topping infused with coffee, enhancing the chocolate intensity for a bold and luxurious finish.
Each step is surprisingly simple, but patience is key. Allowing the chocolate cream to set before adding the ganache ensures the perfect texture.
Preparation Time: Between 30 to 40 minutes
Chilling Time: Up to 6 hours for the ultimate creamy and refreshing bite
The result is a cheesecake with an irresistibly smooth texture, deep chocolate flavor, and a touch of coffee that lingers with every forkful. A dessert that’s effortless yet unforgettable.
Decadent Ingredients for the Ultimate No-Bake Chocolate Cheesecake
Every ingredient in this cheesecake is carefully chosen to create a rich, creamy, and intensely chocolatey dessert. Here’s what you’ll need:
– For the Oreo Crust:
- 20 Oreo cookies – Crushed into fine crumbs to form a chocolatey, slightly crunchy base.
- 4 tablespoons unsalted butter – Melted and mixed with the Oreos to bind the crust together.
– For the Chocolate Cream Cheese Filling:
- 350 g dark chocolate (roughly chopped) – Provides deep, intense chocolate flavor. Using high-quality chocolate makes a difference.
- 1 teaspoon espresso powder – Enhances the richness of the chocolate without making it overly coffee-flavored.
- 560 g Philadelphia cream cheese (room temperature) – The key to a smooth, creamy, and rich filling.
- 150 g powdered sugar – Adds sweetness while keeping the filling light and airy.
- 50 g brown sugar – Introduces a subtle caramel-like depth to balance the chocolate.
- 1 teaspoon vanilla extract – Enhances the overall flavor and adds warmth.
- 280 ml heavy cream (room temperature) – Whipped into the mixture to create a luscious, melt-in-your-mouth texture.
– For the Dark Chocolate Coffee Ganache:
- 100 g dark chocolate – Melted to create a silky, glossy topping.
- 1 teaspoon instant coffee powder – Infuses the ganache with a subtle coffee aroma, deepening the chocolate flavor.
- 200 g heavy cream – Creates a rich, pourable consistency for the ganache, ensuring a smooth finish.
How to Make the Perfect No-Bake Chocolate Cheesecake
Follow these simple steps to create a creamy, rich, and chocolatey no-bake cheesecake with a smooth coffee-infused ganache.
Step 1: Prepare the Oreo Crust
- Crush the Oreo cookies into a fine powder using a food processor.
- Add the melted butter and instant coffee powder, then mix until well combined.
- Press the mixture firmly into the bottom of a 20 cm (8-inch) pastry ring or springform pan.
- Place the crust in the freezer for 15 minutes to set.
Step 2: Make the Chocolate Coffee Cream Cheese Filling
- Melt the dark chocolate using a double boiler (bain-marie).
- Stir in the instant coffee and set aside to cool slightly.
- In a large bowl, soften the Philadelphia cream cheese by mixing it until smooth.
- Add the powdered sugar, brown sugar, vanilla extract, and heavy cream. Mix until fully combined.
- Quickly fold in the melted chocolate, stirring until the mixture is smooth and homogeneous.
- Remove the Oreo crust from the freezer and pour the chocolate cream filling over it.
- Refrigerate for at least 6 hours to allow the cheesecake to set.
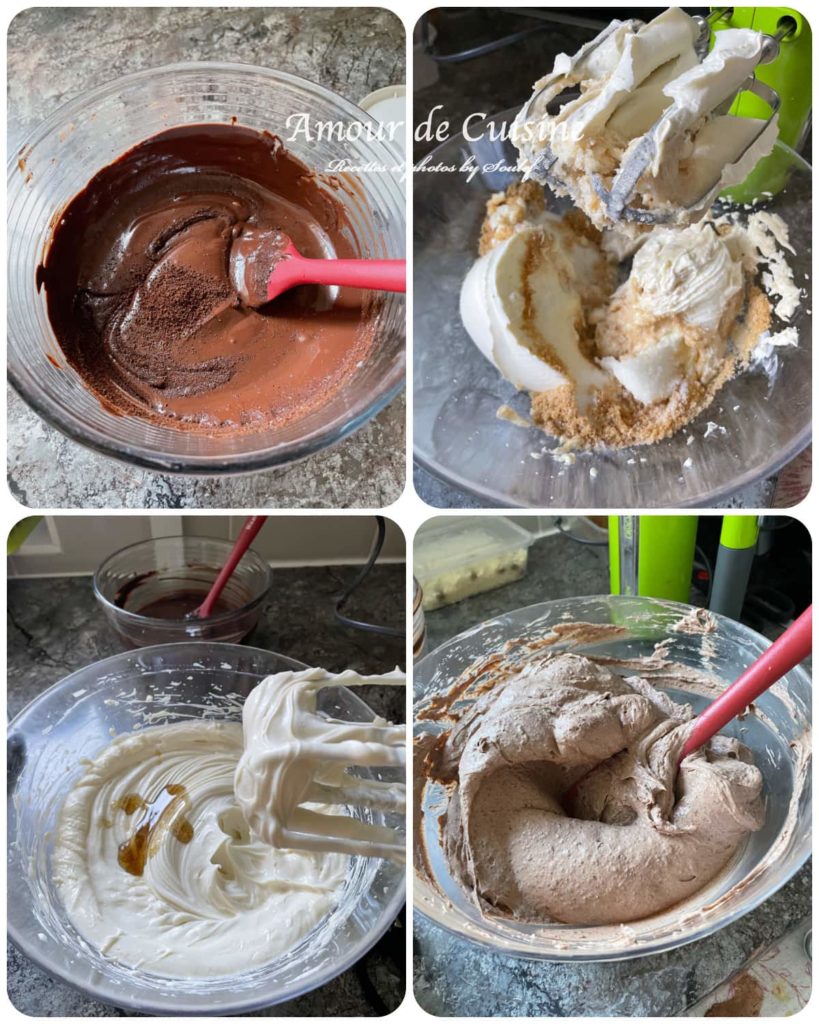
Step 3: Prepare the Chocolate Coffee Ganache
- Finely chop the dark chocolate and place it in a bowl.
- Heat the heavy cream in a small saucepan over medium heat until warm, then add the instant coffee.
- Pour half of the hot cream over the chopped chocolate and let it sit for 2 minutes.
- Stir gently, then add the remaining hot cream and mix until smooth.
- Set aside half of the ganache in the fridge to thicken slightly before piping.
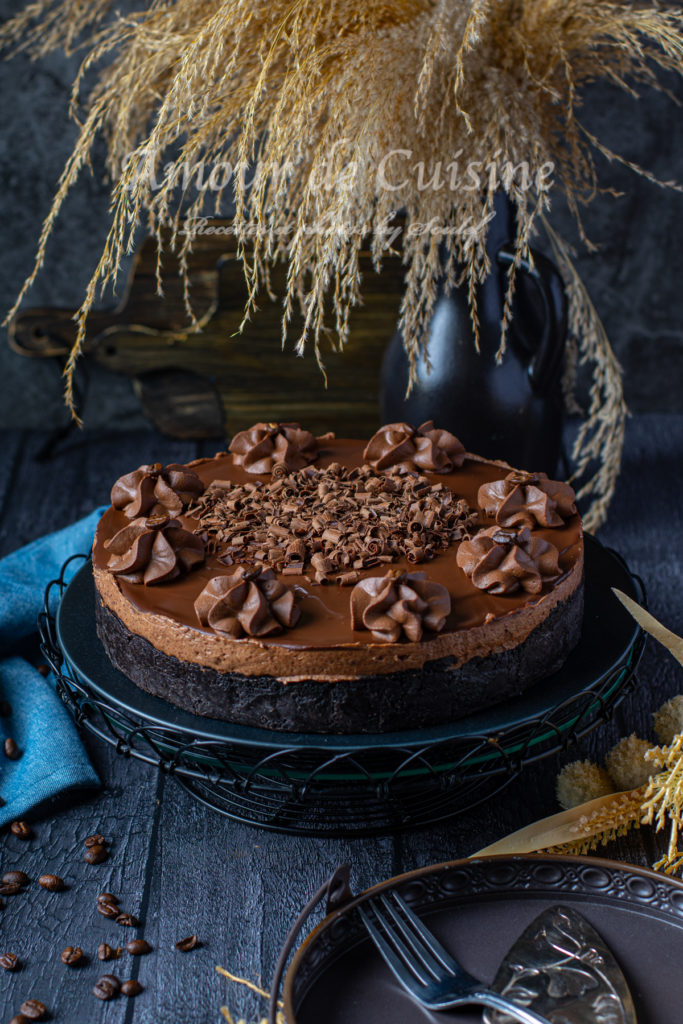
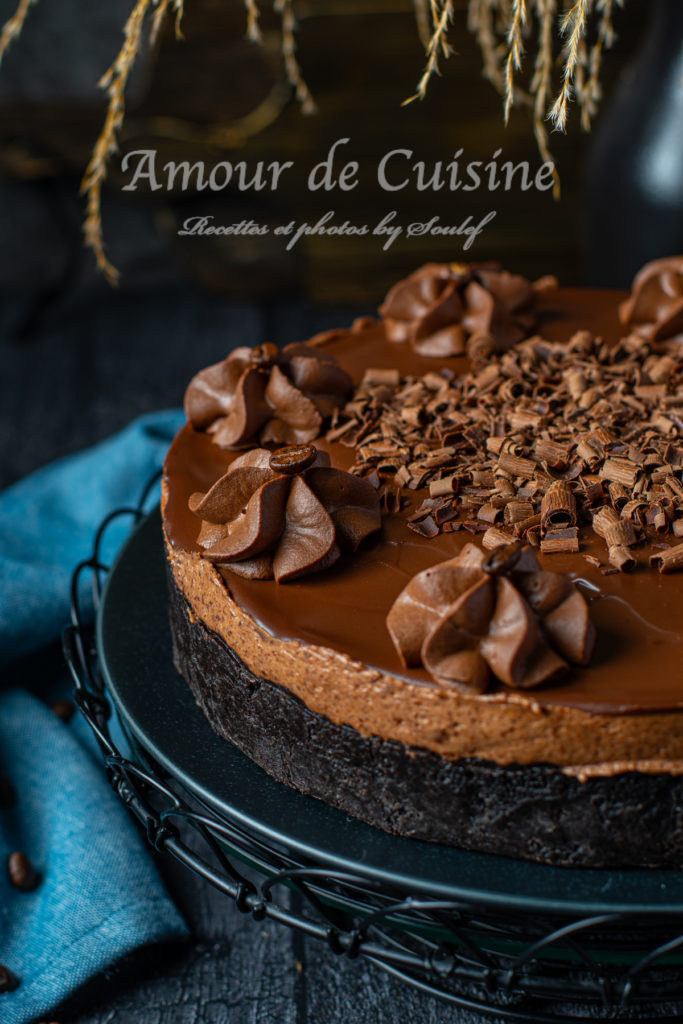
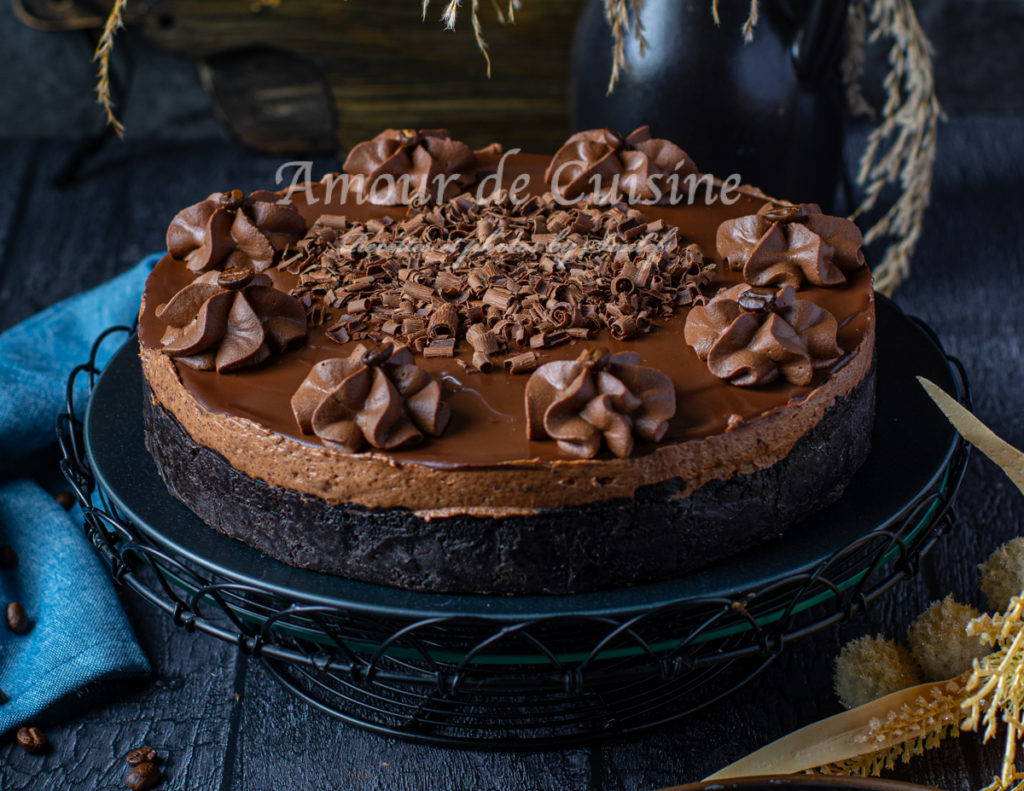
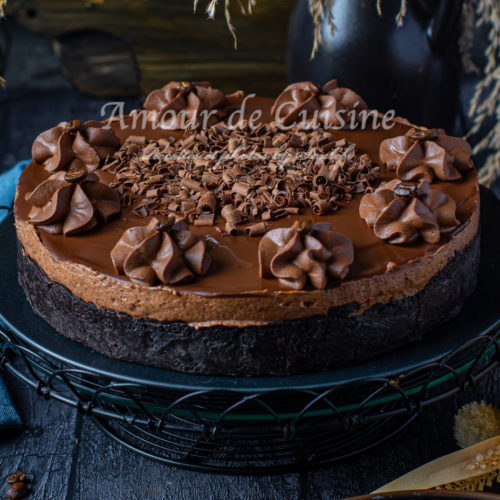
Step 4: Decorate the Cheesecake
- Spread the remaining ganache evenly over the chilled cheesecake.
- Transfer the refrigerated ganache to a piping bag fitted with a star nozzle.
- Pipe decorative swirls around the edges of the cheesecake.
- Finish by adding chocolate shavings in the center for an elegant touch.
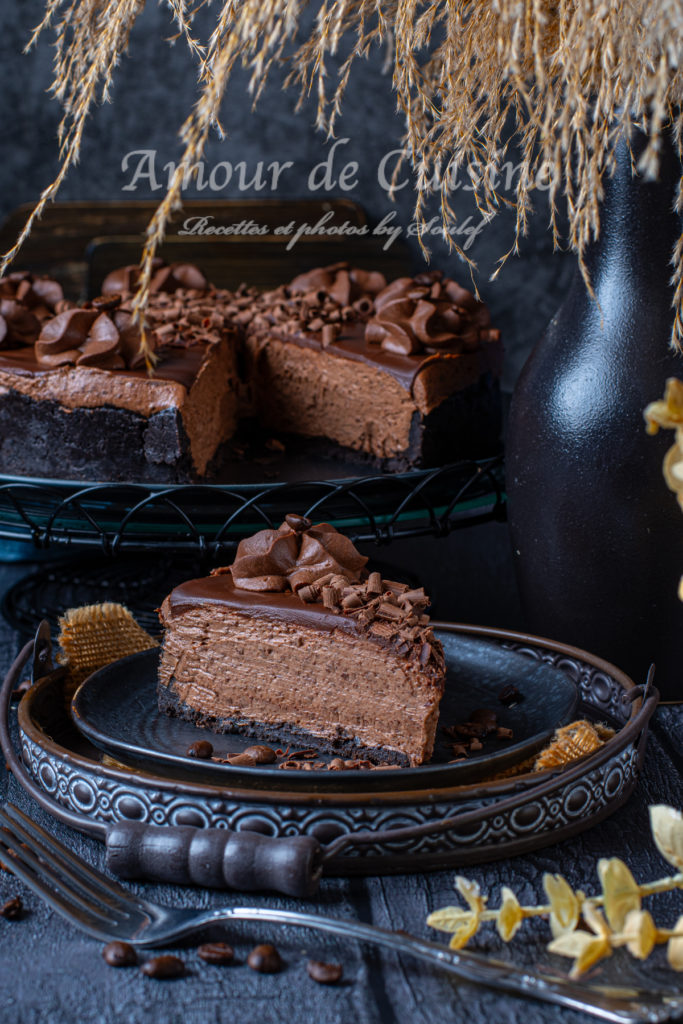
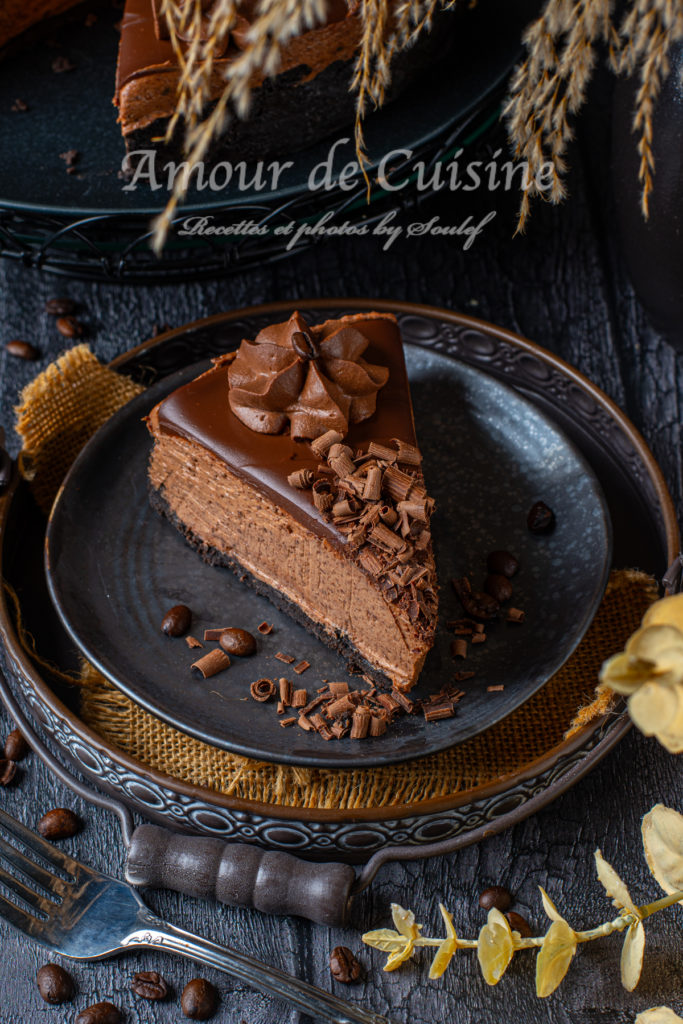
Step 5: Serve Like a Pro
For perfect slices, use a sharp, thin-bladed knife. Wipe the blade clean between each cut for smooth, picture-perfect servings.
Enjoy every creamy, chocolatey bite!
Tips for the Perfect No-Bake Chocolate Cheesecake
Mastering a no-bake cheesecake is all about technique and preparation. Follow these key tips to ensure a smooth, rich, and perfectly set dessert.
How to Make the Perfect Crust
- No need to scrape out the cream from the Oreo cookies—blend them whole in a food processor until they turn into fine crumbs. The filling adds extra moisture and helps bind the crust together.
- Since this is a no-bake crust, make sure to press it firmly into the base of the pan. A well-packed crust prevents crumbling when slicing the cheesecake.
- Use a springform pan or a pastry ring to easily release the cheesecake once it has set. Lining the bottom with parchment paper can also help with effortless removal.
The Secret to a Silky Smooth Filling
- Use room temperature cream cheese – Cold cream cheese won’t blend smoothly and may cause lumps. Take it out of the fridge at least two hours before starting the recipe.
- When mixing the melted chocolate into the cream cheese mixture, ensure the chocolate is slightly cooled but still fluid. This prevents it from solidifying too quickly and creating uneven texture.
How to Store Your No-Bake Chocolate Cheesecake
- This chocolate cheesecake keeps well for 3 to 5 days in the refrigerator.
- Store it in an airtight container or under a cake dome to preserve its flavors and prevent it from absorbing any fridge odors.
- For longer storage, you can freeze the cheesecake (without the ganache topping) for up to 2 months. Wrap it tightly in plastic wrap and foil, then thaw in the fridge overnight before serving.
With these simple tips, your cheesecake will have a perfectly creamy texture, a stable base, and a deep, rich chocolate flavor that stays fresh for days.
Others desserts to try
- Black Forest Cake, Authentic German Dessert recipe
- Homemade Strawberry Jam Recipe (No Pectin)
- The best Oreo tiramisu Recipe
The Best No-Bake Chocolate Cheesecake – Rich, Creamy & Effortless
Ingredients
For the Oreo Crust:
- 20 Oreo cookies
- 4 tablespoons unsalted butter
For the Chocolate Cream Cheese Filling:
- 350 g dark chocolate roughly chopped
- 1 teaspoon espresso powder
- 560 g Philadelphia cream cheese room temperature
- 150 g powdered sugar
- 50 g brown sugar
- 1 teaspoon vanilla extract
- 280 ml heavy cream room temperature
For the Dark Chocolate Coffee Ganache:
- 100 g dark chocolate
- 1 teaspoon instant coffee powder
- 200 g heavy cream
Instructions
Step 1: Prepare the Oreo Crust
- Crush the Oreo cookies into a fine powder using a food processor.
- Add the melted butter and instant coffee powder, then mix until well combined.
- Press the mixture firmly into the bottom of a 20 cm (8-inch) pastry ring or springform pan.
- Place the crust in the freezer for 15 minutes to set.
Step 2: Make the Chocolate Coffee Cream Cheese Filling
- Melt the dark chocolate using a double boiler (bain-marie).
- Stir in the instant coffee and set aside to cool slightly.
- In a large bowl, soften the Philadelphia cream cheese by mixing it until smooth.
- Add the powdered sugar, brown sugar, vanilla extract, and heavy cream. Mix until fully combined.
- Quickly fold in the melted chocolate, stirring until the mixture is smooth and homogeneous.
- Remove the Oreo crust from the freezer and pour the chocolate cream filling over it.
- Refrigerate for at least 6 hours to allow the cheesecake to set.
Step 3: Prepare the Chocolate Coffee Ganache
- Finely chop the dark chocolate and place it in a bowl.
- Heat the heavy cream in a small saucepan over medium heat until warm, then add the instant coffee.
- Pour half of the hot cream over the chopped chocolate and let it sit for 2 minutes.
- Stir gently, then add the remaining hot cream and mix until smooth.
- Set aside half of the ganache in the fridge to thicken slightly before piping.
Step 4: Decorate the Cheesecake
- Spread the remaining ganache evenly over the chilled cheesecake.
- Transfer the refrigerated ganache to a piping bag fitted with a star nozzle.
- Pipe decorative swirls around the edges of the cheesecake.
- Finish by adding chocolate shavings in the center for an elegant touch.
Step 5: Serve Like a Pro
- For perfect slices, use a sharp, thin-bladed knife. Wipe the blade clean between each cut for smooth, picture-perfect servings.